Data Recovery Guide for Mac

Introduction

Welcome

data-recovery-windows-guide


Welcome to the user manual for VirtualLab Client for Windows, the most powerful and successful remote data recovery software available. VirtualLab, the culmination of more than 15 years of experience in the data-recovery business, provides a whole suite of tools for recovering lost data, analyzing the data to determine its quality and saving it to a storage device of your choosing (you can even save via FTP your recovered data!)

When you perform a recovery session using VirtualLab, we can almost guarantee that you will recover the files you have lost. You don’t even have to pay for our software unless you have used its free scanning and data-analysis capabilities to determine it will work for you. It’s like having an experienced data-recovery technician in your own home or business!

1

0

Back To Top

How To Use This Manual

We suggest that you read this manual from beginning to end before you install and use VirtualLab™. Inside this guide, you’ll find a wealth of information about the VirtualLab Cient application and the data-recovery process. Although more experienced will be tempted to skip a section or two, we feel that everyone will benefit from at least one complete reading. And besides, our writers will sleep more comfortably knowing their efforts haven’t gone unnoticed

Here’s an overview of each major section of the manual:

Introduction
The Introduction (that’s what you’re reading right now) welcomes you to the large, happy and ever-growing family of VirtualLab™ users. In this section, we explain how our groundbreaking software works, list the types of systems with which it is compatible, define some data-recovery lingo and unveil the single most important rule of data recovery.

Getting Started
Here’s where we tell you how to install and uninstall VirtualLab™ Client. If the application is already installed on your computer, you should uninstall it before you install the new version.

Recovering Lost Data
This section is the nucleus of the manual. Here we guide you step by step through the data-recovery process. When you begin a new recovery session, start with “Pre-Recovery Checklist,” and follow the instructions until you reach the end of the section, at which point your data recovery should be a success! If for some rare and strange reason the recovery didn’t go as planned, you probably can find the solution to your problem in the FAQs and Troubleshooting sections.

Frequenty Asked Questions
As we said earlier, we’ve been in this business for a very long time. Over the years, we’ve fielded so many questions from customers that they would fill several volumes. We did manage to compile a list of the questions we see most often, and we’ve listed them here, along with the answers, in the Frequently Asked Questions (FAQs) section.

Troubleshooting
The Troubleshooting section contains the solutions to just about every potential problem you may experience when using VirtualLab™.

Upgrading VirtualLab
This short little section tells you how to keep your VirtualLab™ software up to date.

Need Further Assistance?
What if you’ve read this manual from cover to cover and followed every instruction, and you’re still experiencing problems? Just check out the Need Further Assistance? section for details on how to contact the folks at Total Recall. We kindly ask that you please refer to this manual one last time before contacting us (our technicians are super busy!) to see if the answer to your problem can be found within.

0

0

Back To Top

Important Terms

As you use VirtualLab™ and read this user manual, you’ll come across terms with which you may not be familiar. To keep you from having to pull out your dictionary, we’ve compiled the following list of definitions:

Bad Device
This is the storage device that contains the data you want to recover. A bad device can be any disk-like storage media, such as your computer’s hard drive, an external hard drive, Flash card or any other form of removable media.

Good Device
This is a storage device that is in perfect working order onto which you want VirtualLab™ to save the data recovered from the Bad Device. The Good Device may be located on the computer on which you’ve installed VirtualLab (the “host” computer) or on any other computer accessible from the host via a network connection. The Good Device can be any of the storage media listed for the Bad Device.

Host Computer
This is the computer on which you have installed VirtualLab™ Client. The Host Computer is used to recover the lost data from the Bad Device, which should be connected to the Host Computer as a secondary drive (or slave). This means that the Host Computer will have at least two disks:

The Good Device, which can be the Host Computer’s own hard drive or any other computer or removable media accessible via a network or external device

The Bad Device
If you are using removable media such as a Zip disk or Flash card, you should insert the device prior to launching VirtualLab™ Client.

Client/Server
Client/server describes a method of networking computers in which one or more computers (clients) make resource and service requests to a server, which in turn provides resources and instructions for the clients. For more information, see How Does VirtualLab™ Work?

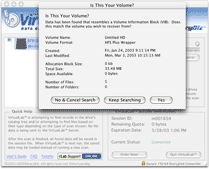
HFS (or HFS Standard)
Short for “hierarchial file system,” HFS is a file system format for Macintosh computers that stores the locations of all folders and files on a drive. This format is used on older Macintosh computers and has since been replaced with the HFS+ format.

HFS+ (or HFS Extended)
Short for “hierarchial file system plus,” this is the replacement for HFS that has many benefits over the older format. All new Macintosh computers use this file system format.
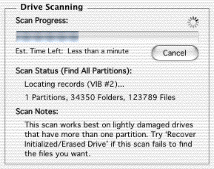
Partition
A partition is a logical division of a hard disk that creates the impression that you have more than one hard disk. Say you want to run two different operating systems on the same hard disk. You would create a two-partition drive when you format the disk. Partitioning a disk is just a way to divide it up into independent sections.

HDD
Short for “hard disk drive,” an HDD helps manage the transfer of data to and from your computer’s hard disk. Because these two items always come as a single unit, “hard disk drive” and “hard disk” or “hard drive” are usually used to refer to the same thing.

0

0

Back To Top

What is VirtualLab™?

VirtualLab™ is a complex data recovery client developed for non-destructive data recovery from hard disk drives and other storage devices via an encrypted connection over the Internet to the VirtualLab Server. It may sound complicated at first, but after reading this manual and using VirtualLab™, you’ll see that despite the complexity of the software, it’s still fairly easy to use. Here’s a little bit about the software:

VirtualLab™ can recover folders and files that were lost because of the following:

  • intentional (trashed files) or unintentional deletion
  • viruses
  • formatting of a disk
  • reinitialization of a disk
  • all other non-physical data loss problems

VirtualLab™ can recover files and folders from disks on which the following components have become corrupted (or even if they are completely missing):

  • partition map
  • volume information block
  • HFS/HFS+ catalog/extents tree

When VirtualLab™ recovers your data, you have the options of saving it to another hard drive, a network drive, a floppy disk or some other type of storage device.

0

0

Back To Top

How Does VirtualLab™ Work?

VirtualLab™ is modeled on a networking technology called “client/server.” In a client/server network, a server acts as the master to one or more client machines. The server typically serves as a central repository for files and applications that the clients may access by connecting to the server via a network connection. The server acts as the “brain” of the network by managing the transfer of information and sending instructions to the clients.

In keeping with this client/server model, we have designed VirtualLab™ to include two closely interacting applications: VirtualLab™ Server and VirtualLab™ Client.

VirtualLab™ Server

VirtualLab™ Server, physically located at the BinaryBiz facility, is the brain of the data-recovery process. This portion of the system uses sophisticated and innovative algorithms to remotely analyze a Bad Device and build a virtual file system on the Host Computer that mirrors that of the Bad Device. These routines are the culmination of more than 15 years of human experience in the data-recovery field. In essence, we’ve distilled the experience and knowledge of our technicians into the artificial intelligence at work in the VirtualLab™ Server.

VirtualLab™ Client

VirtualLab™ Client is the application you must download and run on the Host Computer. Much of what it does is governed by commands it receives from VirtualLab™ Server. VirtualLab™ Client is responsible for gathering data from the Bad Device and sending compressed and encrypted information about that data to VirtualLab™ Server. VirtualLab™ Client then builds a virtual file system on the Host Computer based on the analysis results it receives from VirtualLab™ Server. Once the virtual file system is complete, VirtualLab™ Client allows you to select which “lost” folders and files you want to save to the Good Device.

ASTERISK No data files or any other personal information is sent to, or stored by, VirtualLab™ Server (we’re big privacy advocates here at BinaryBiz!).

0

0

Back To Top

System Requirements

VirtualLab™ works on all Macs that meet the following requirements:

  • MacOS 9.2 and higher with CarbonLib 1.6
  • or MacOS X 10.2 and higher
  • PowerPC CPU (G3 or G4 recommended)
  • 2MB of free hard drive space
  • Secondary storage device (although not required, we recommend you have a secondary storage device for saving your recovered files; be sure it has enough space to recover the recovered data)
  • Active Internet connection

0

0

Back To Top

Supported File Systems and Storage Media

Supported Storage Media

VirtualLab can be used to recover data from the following types of devices:

  • IDE HDD (this is what your computer probably uses)
  • SCSI HDD (usually an external hard drive)
  • RAID volumes
  • Dynamic drives
  • Zip/Jaz drive
  • Compact Flash cards and other disk-like media that use an HFS file system to store files

Note: The current version of VirtualLab does not support CD-Rs, CD-RWs, DVDs or tape devices.

Supported File Systems

VirtualLab supports the following file systems:

  • HFS (used on older Macs and some small-sized media like Compact Flash cards for digital cameras)
  • HFS+ (used by newer Macs and on iPods)

0

0

Back To Top

URGENT – Read This Before Using VirtualLab™

Before you use VirtualLab™™ to recover lost data, you must keep in mind a very important rule:

DO NOT MAKE ANY CHANGES TO THE DISK ON WHICH THE LOST DATA IS LOCATED (the Bad Device)!
The success of your data recovery depends largely on your adherence to this crucial rule. When we say to make no changes to the damaged disk, we mean that you basically should leave the disk alone. This includes the following:

  • Do not try to delete folders or files from the Bad Device, even if you are able to see them and think that they are not damaged.
  • Do not try to save anything to the Bad Device.
  • Do not attempt to format or re-partition the Bad Device, not even with a program like mac-fdisk. If the support people for these or any other applications tell you it’s OK to format or re-partition the Bad Device, do not listen to them.

You risk permanent data loss if you do not heed these warnings. If you already have made one of these mistakes, don’t worry. Just don’t make any more changes to the Bad Device. You can use VirtualLab™ Client for free to see if your data is still recoverable. And even if VirtualLab™ can’t see the lost data or the Bad Device, all is not lost. Professional, in-lab data recovery specialists still may be able to help. To get a quote for an in-lab data recovery, we suggest BinaryBiz. BinaryBiz Data Recovery Web site.

0

0

Back To Top

Getting Started

Pre-Installation Checklist

Before you install VirtualLab™ Client on the Host Computer, it’s very important that you complete the following five items on the following checklist:

First of all, do not install VirtualLab™ on the Bad Device. Remember the golden rule of data recovery: never change anything on the Bad Device!

Make sure you have enough memory on the Host Computer for VirtualLab™ Client. The application requires only about three megabytes of space, but we recommend as much as 100 megabytes plus the size of files you are trying to recover.

Make sure you have enough free space on your Good Device. You need space for more than just your lost data. Here’s a list of everything that may need to be saved to the Good Device before and during a recovery session:

  • The lost data. You should plan on recovering at least as much as was lost on the Bad Device. And you may need even more free space than what was lost because VirtualLab™ may recover files and folders you intentionally deleted in the past. If you decide to recover all recovered folders and files, you will have more files than what you used to ‘see’ before the failure/data loss.
  • VirtualLab™ Client application. If you are using a single computer as the Host Computer and the Good Device (that is, you plan to save your lost data to the same computer on which you have installed VirtualLab™ Client), you must have enough room for the application itself. It takes up only a few megabytes of space, so it probably won’t create any memory issues. Regardless, it never hurts to consider those few megabytes when checking your available memory.
  • Temporary files created by VirtualLab™ and files that track your session progress. During a recovery session, VirtualLab™ creates temporary working files on the Good Device. These files could take up dozens of megabytes of memory but usually average around 20-50MB.

If you want to save just a small amount of data, you can use a floppy disk as the destination drive; otherwise, you need to use a local or network drive. If you don’t have enough free space, you may want to switch to a Host Computer or Good Device with more free space.
Close all other applications to improve performance during installation. Although not necessary, this is highly recommended.

VirtualClient does not allow you to save recovered data to the device you are recovering the data from. Doing so could overwrite the very data you are trying to recover! Therefore, you must make sure you have a master/slave hard drive configuration that isolates the Bad Device from the Good Device or you use an external device such as a Firewire, USB, or external SCSI drive to save recovered data to.

0

0

Back To Top

Installation

Follow these steps to install VirtualLab™ Client on the Host Computer:

1. Make sure the Host Computer meets all of the system requirements and that the Host Computer and Good Device have sufficient memory available, as defined in the pre-installation checklist.

2. If you are upgrading from a previous installation on OS X, uninstall the older version of VirtualLab™ Client first by dragging the application to the trash and emptying the trash.

3. Download VirtualLab™ Client if you have not already done so.

4. Unstuff the VirtualLab™ Client archive with Stuffit or some other file-compression utility.

5. If you have Mac OS 9.x (Classic)
After you unstuff the archive, you’ll see a VirtualLab™ folder on your desktop. You may place this folder anywhere on the Host Computer.Your installation is complete.You can skip the remaining steps. REMEMBER: Don’t place the application on the drive that you are trying to recover (the Bad Device)!

If you have Mac OS X
Cotinue with the remaining steps to complete installation.

6. After you unstuff the archive, you will see a disk image with the extension .img on your desktop. Double-click this file to mount the image.

7. Once it is mounted, you’ll see a drive on your desktop similar to the one to the right. Double-click the drive to open it.

8. In the window that appears, double-click the Mac OS X folder.

Choose-OS

9. Double-click the VirtualLab™ installer file. The Installer launches.

10. OS X requires that you enter your system user name and password. Do so, and then click OK. The Installer Welcome screen displays.

Install-Welcome

11. Accept the software license agreement when prompted to do so.

12. Select a destination drive on which to install the application. DO NOT INSTALL THE SOFTWARE ON THE BAD DEVICE!

13. Follow the remaining on-screen instructions to complete instructions. You will see a confirmation that VirtualLab™ was successfully installed.

0

0

Back To Top

Recovering Lost Data

Pre-Recovery Checklist

Before you begin a recovery session, you should make sure you’ve addressed every item on this checklist. You should have already taken care of some of these before you installed VirtualLab™ Client, but it never hurts to check twice. After all, your data is at stake here!

checkmark Remember the golden rule of data recovery: never change anything on the Bad Device! (We know you’re sick of hearing it at this point, but believe us, it’s for your own good.)
   
checkmark Check that you have enough free space on the Good Device. Remember, you may need more free space than the amount that was used by your lost data. If you don’t have enough free space, you may need to use a different Good Device. You should review the pre-installation checklist for more detail about what you should consider when checking your available memory.
   
checkmark Create an empty folder on the Good Device which you will use for saving temporary files and files that contain information related to the progress of your recovery session. When you begin a recovery session, VirtualLab™ will ask you to tell it where that folder is located. Again, make sure the Good Device has enough free memory to store these files, which could take up as much as 50-100 megabytes.
   
checkmark Close all other applications. This will ensure that system resources won’t be diverted to other programs during the recovery session.

Next step: Launching VirtualLab™ Client

0

0

Back To Top

Launching VirtualLab™ Client

  1. Quit all other applications if possible (you may leave a Web browser window open to view this manual or to order Session ordering after a drive scan).
  2. Navigate to the folder on your hard drive containing the VirtualLab™ application. for your specific system (The MacOS X version will NOT run under MacOS 9.x and vice versa). If you are using OS X, the application can be found in the BinaryBiz VirtualLab™ folder found in your Applications folder (unless you moved it somewhere else).
  3. Double-click the application to launch it. A Welcome Screen will appear after a few seconds with options of how to proceed.
  4. Select the reason for using VirtualLab in this first screen and click ‘Next’.
  5. To open a recovery session, select one of the following three choices on the Welcome screen:

Start a new VirtualLab™ Recovery – Select this option If this is the first time you have run VirtualLab™ or your demonstration session ID has expired (If you have a session for which you have purchased Quota and your session has expired, refer to the FAQs and Troubleshooting section for more information).

Load an previous VirtualLab™ Session File – Select this option to open an existing session file. You will be asked to navigate to the session file you wish to open.

Recreate a lost/deleted VirtualLab™ Session File – Select this option if you have used VirtualLab™ but have lost or deleted your session file. You must be able to remember your session ID and password to create a new session file (be sure to write it down!). If you do not know your session ID and password, but have purchased Quota, you should contact support.

0

0

Back To Top

Starting a New Recovery Session

  1. On the Welcome screen, select the reason for using VirtualLab from the list of options if you haven’t already and click Next.
  2. The select Start a new VirtualLab Recovery and click Next. You’ll see a short series of messages while Virtual Client is attempting to connect. Then your session information will display. Be sure to write down your session ID and password! You can retrieve this information at any time by going to File > Show Session Info.New-Session-Info-Rcvd
  3. Next VirtualLab will tell you it is preparing to create your session file. Navigate to a location in which to save the session file and click Save.
  4. The VirtualLab workspace displays, and the recovery session is now open.
EXCLAMATION Remember: Do not save the session file to the Bad Device! Save it to the Good Device. The temporary session-related files may occupy dozens of megabytes, so make sure the Good Device has plenty of free space.

And do not delete your session file or any of the contiguous files created by VirtualLab until you are completely finished with your session! These files track session progess and other data that are used by VirtualLab Client and VirtualLab Server.

Next step: Selecting the Bad Device

0

0

Back To Top

Creating a New Session File

Use this option when you have lost or deleted your session file for an existing session and you know the session ID and password. If you do not know your session password, please visit the VirtualLab website and use the VirtualLab Session Manager.

ASTERISK If you have paid for a session, be sure to use that same session! Your session details are stored within each session file. None of your data is saved in this session file. It is solely for the purpose of keeping track of your data recovery session.

Enter-Login

  1. On the Welcome screen, select Recreate a lost/deleted Session File and click Next.
  2. Enter the session ID and password for the session you wish to open and click Next. VirtualLab Client will connect to VirtualLab Server, and a quick scan of your system will be done in order to find all connected drives.
  3. VirtualLab then asks you to select a location in which to store the new session file. Select a location and click Save. The recovery session is now open.
ASTERISK Remember: Do not save the session file to the Bad Device! Save it to the Good Device. The temporary session-related files may occupy dozens of megabytes, so make sure the Good Device has plenty of free space.

Next Step: Selecting the Bad Device

0

0

Back To Top

Loading an Existing Session File

EXCLAMATION If you have paid for a session, be sure to load that same session at launch (eg, do not create a new session). Your session details are stored within each session file that is automatically created and saved on the Client side (you).None of your data is saved in this session file. It is solely for the purpose of keeping track of your data recovery session.
  1. On the Welcome screen, select Load a previous VirtualLab Session File and click Choose Session File. You will be prompted to select a session file from your hard drive.Choose-File
  2. Select a session file and click Choose. Session files have the extension .job. The Welcome screen will display again.
  3. Click Next. VirtualLab Client will connect to VirtualLab Server, and a quick scan of your system will be done in order to find all connected drives. Your session is now open.

Next step: Selecting the Bad Device

0

0

Back To Top

Advanced Settings

You may experience problems connecting to VirtualLab Server if you are operating behind a network firewall. If this is the case, you may connect via a proxy sever by modifying the advanced network settings. Here’s how:

ASTERISK Instead of attempting to connect via a proxy server, you also can ask your network administrator to unblock outgoing connections on port 5050. This should prevent the firewall from blocking your connection to VirtualLab Server.

Advanced-Settings

  1. On the Welcome screen, click Network Settings.
  2. Select the Use Proxy Server box.
  3. Complete the remaining details on the screen. If you do not know what kind of SOCKS protocol is used in your firewall, or if you are just unsure how to use these options, ask your network administrator for help.
  4. Click OK to save your changes
EXCLAMATION VirtualLab™ can connect via SOCKS4 or 5 proxy servers ONLY! VirtualLab™ is UNABLE to connect through Web/HTTP proxies!

0

0

Back To Top

Selecting the Bad Device

After you connect to VirtualLab Server, you’ll see a list of all physical and logical drives found by VirtualLab on the Good Device.

Drive-List

Most, if not all, of the drives listed will have a name. This provides the best way to find the volume you wish to recover. If the name of the drive is not present, look for a drive named “Unknown Drive” or “Unknown Volume” that is the same size as the drive you wish to recover. A volume or drive is given the name “Unknown” only because VirtualLab™ wasn’t able to retrieve its name. This does NOT mean that you cannot recover files from the drive.

If you cannot find the drive you wish to recover and you know that the drive is connect and powered up, please see the Troubleshooting section.

Next step: Choosing the Recovery Method

0

0

Back To Top

Choosing the Recovery Method

After selecting the drive you wish to recover, you must specify the recovery method you wish to use. Depending on whether you have the actual drive or a partition on the drive selected, you will see one of these two selection boxes. If you already have a scan saved in the session file, it will appear in the list below the scan methods. To load a previously saved session, select the type of scan you wish to load, and click the ‘Load Saved Scan’ button.

Select-Method-Drive

Search for Lost Partition

This method searches the selected drive for a single location and locates the catalog tree on that drive. This scan works best on lightly damaged drives that have just recently failed to mount. If the Search for Lost Partition Scan fails to recover your data, use the Recover Initialized/Erased Drive scan.

Recover Initialized/Erased Drive

This method searches the selected drive for catalog tree fragments and deleted partitions, and can also search for files by type.This method may take quite a while to complete.


Select-Method-Partition

Recover Damaged Drive

This method locates the catalog tree in the selected partition. This will take a short amount of time to complete. This scan works best on lightly damaged partitions. If the Recover Damaged Drive method fails to recover your data, try selecting the actual drive and select the Find All Partitions of the Recover Initialized/Erased Drive.

Recover Deleted Files

This method searches the unused/erased portion of the selected partition for deleted files. After clicking ‘Start New Scan’ you will be presented with a dialog that will ask you which file types you want to search for. It will also ask how large the largest file you are searching for is.

Search For Volume Information

This option will cause VirtualLab to search within the selected partition for a Volume Information Block (VIB) before starting the scan. When VirtualLab finds a valid VIB, you will be presented with a dialog in which you should verify the information and accept the VIB or continue searching for one.

Enable Low Level Scan

This MacOS 9 only option will cause VirtualLab to perform the scan at a very low level. This is needed if VirtualLab hangs or crashes during a scan. It should not be used unless this occurs as it increases the amount of time it takes to scan the selected partition.

Next step: Scanning the Disk

0

0

Back To Top

Scanning the Disk

When you click Start New Scan, VirtualLab Client begins to perform a thorough scan of the drive. Depending on the size of the disk, this could take quite a while. Below the progress bar, you’ll see the estimated time remaining in the scan.

To take full advantage of VirtualLab’s wondrous abilities, you must wait until the disk has been fully scanned. However, if you simply do not have time to wait for a lengthy scan, you can clickCancel. The recovery process will continue, but only for the data that was scanned before you clicked Cancel. This partial recovery may gave you an idea of how much success VirtualLab will have in recovering all of your lost data. Just be sure to perform a full scan later when you do have the time.

What happens next depends on which recovery method you chose:

Find All Partitions Method

If you selected Find All Partitions, VirtualLab will scan your disk and display the recovered files. It’s that simple.
Scanning


Search for Lost Partition Method

If you chose this method, VirtualLab will search your drive for volume information blocks (VIBs) and ask you to verify which one is the partition you are seeking. Once you find the one you wish to recover, VirtualLab will scan the the partition and display the recovered files.
Your-Volume

Recover Initialized/Erased Drive Method

If you chose this method, VirtualLab will ask you if you would like to include a file type search.If you choose to do so, you will be asked to select which file types you would like to recover.

File-Type1

If you don’t see the file type you wish to recover on the list, click Add to create a new file signature. To create this new signature/type, you must have at least five unique files of that type on your disk. Once you have selected the file types you wish to recover, VirtualLab will scan the disk and display the results. This recovery method probably will take a significant amount of time to complete.

Recover Damaged Drive Method

If you selected Recover Damaged Drive, VirtualLab will scan your disk and display the recovered files. It’s that simple.

Recover Deleted Files Method

If you chose this method, VirtualLab will ask you which file types you would like to recover.

File-Type1

If you don’t see the file type you wish to recover on the list, click Add to create a new file signature. To create this new signature/type, you must have at least five unique files of that type on your disk. Once you have selected the file types you wish to recover, VirtualLab will scan the disk and display the results. This recovery method probably will take a moderate amount of time to complete.

Next step: Previewing Recovered Files

0

0

Back To Top

Previewing Recovered Files

Once the scan is complete, you should test the quality of the recovered files by viewing their contents. To do so, just double-click a file to open it. The file preview will display.

If you are able to view the contents of several text or image files, then it’s safe to say that your files of other types also were recovered successfully.  

ASTERISK Note: The File Viewer allows you to preview only text files, images and movies.

File-Preview-TextFile-CompareIf you preview a file that is not supported by VirtualLab, it may appear as gibberish. If this happens, you may have to perform an additional step to verify that the data from this file is indeed intact. Click the ‘Compare To Valid File‘ button to perform this additional step. You will then be asked to locate a file on your hard drive. Find one that is similar to the file you are previewing (ex. If you are previewing a Microsoft Word document, locate a Microsoft Word document on your computer and open it). You will then be presented with a ‘VirtualLab File Compare’ window. In this window, the data that VirtualLab sees for the file is shown in the top box and the data from the file you chose is shown in the bottom box. All similar bytes will be marked red in the respective box. The more similar bytes between the files, the better your chance of recovering the file is. If there are no similar bytes, the chances of the file coming back intact are very low and you should try other files before comitting to purchasing the session.

Next step: Saving Recovered Files

0

0

Back To Top

Saving Recovered Files

Now you’re ready to recover those lost files! Here’s how:

  1. Select-FilesUse the triangles to expand folders to find the files you wish to recover. To select a file, click the checkbox that appears to the left of it. To select all files within a folder, click the folder’s checkbox. At the bottom of the file list, a counter will track how many files you have selected, along with the size of all selected files.
  2. Click Save Selected Files. You will be asked to select a location in which to save the recovered files.Note:You must activate VirtualLab to save recovered data.
  3. Select a folder on the Good Device to save the recovered files to. Make sure you DO NOT save the recovered files to the Bad Device!
    EXCLAMATION Remember! You can’t save your recovered files to the Bad Device from which you recovered them. If you attempt to do this, VirtualLab will overwrite data you are trying to recover!


  4. When you have chosen a valid save location, click ‘Choose‘. Remember to activate, you will need to do so in order to save your files. If you’ve already activated, you will see bars that show the progress of the file saving.
  5. Once the saving is complete, you will see a confirmation message.
  6. Congratulations! Your files have been recovered!

0

0

Back To Top

Frequently Asked Questions

Can VirtualLab™ Recover My Files?

Most likely, YES!

VirtualLab™ is the most powerful recovery product ever made available to the general public. And although it is much faster and cheaper than using a professional recovery team, we guarantee that it is just as effective. Take a look at the list of supported file systems and storage media to determine if VirtualLab is compatible with your device.

We are so confident in our software, that we won’t even charge you for using it until you’ve determined for yourself that VirtualLab can recover your data. One of VirtualLab™’s features is the ability to show you the data it has found, and you can even save up to 1GB at no charge.

VirtualLab™ can recover files from just about any situation, except for a device with physical damage (if your drive is making any unusual sounds or does not show up in Disk Utilities, then there is likely physical damage. We do not suggest that you attempt a software recovery with VirtualLab, or any other software, but contact a professional data recovery provider such as BinaryBiz). Even if your drive has been initialized, VirtualLab™ can still help.

The best way to determine the recovery possibilities of your data is to download and run the VirtualLab™ Client software.   

0

0

Back To Top

What if I Don’t Have a Second Hard Drive?

If you do not have a second hard drive, you will at least need a second computer. The following methods may work:

  1. If you are running MacOS X: Start up the computer with the Bad Device in Firewire Target Mode (hold down T at startup) and connect it to the second computer using a Firewire cable. The second computer will see the Bad Device as a Firewire volume. (If the drive doesn’t appear on the second computer when you launch VirtualLab make sure you are using MacOS X as MacOS 9 cannot access Firewire drives that do not mount) 
  2. If you are running MacOS 9: Connect both computers over a network and install VirtualLab™ on the second computer with the Good Device. Boot the computer you are trying to recover with the Bad Device (if it will boot) and connect to the second computer via File Sharing (Appletalk or Appletalk TCP/IP). Then navigate to the VirtualLab application on the shared volume and launch VirtualLab. When asked to save the Session File and Recovered Files, save them to the shared volume.

0

0

Back To Top

What Is a Session File?

A session file is a specifically formatted file that VirtualLab™ creates for storing files recovered during a session. Losing this file will NOT cause you to lose the files you have recovered. It will only destroy the drive scans which have been saved. After successfully recovering and saving all of the files you need, you may safely delete the session file.

0

0

Back To Top

Do I Need a Session File?

Yes, VirtualLab™ will not run without a session file, as it needs the file to save recovery scans.

0

0

Back To Top

How Do I Create Custom File Signatures?

File-Type1When you perform a recovery using the Recover Initialized/Erased Drive method, you will be asked if you would like to include a search by file type. If you choose to do so, you will then be asked to select which signatures/types you would like to include in the search. To add new signatures, take the following steps:

  1. Click Add in the file signature list window that displays.
  2. In the Create New Signature dialog box, click Select File and navigate on your hard drive to one of the files that has the same signature you wish to add. You must have at least six unique files of the same type on your hard drive to be able to successfully create a new signature. Do not duplicate a single file five times and then attempt to create a signature. This will work; however, you will not be able to find many (if any) files of that type during a scan.
    Create-New-Sig1

  3. After selecting the file for which you wish to create a signature, VirtualLab™ will scan the drive for more files of the same type and alert you if it was unable to find at least five. VirtualLab™ will also alert you if it was unable to create a signature for the file type you have specified.
  4. If the signature creation process is successful, you will be asked to name the new signature, and it will immediately be available for use during a recovery using the Recover Initialized/Erased Drive method..
EXCLAMATION Note: After reinstalling VirtualLab™, you will lose all custom signatures and will have to recreate them.

0

0

Back To Top

Troubleshooting

Why Can’t I Connect?

VirtualLab™ requires an internet connection at all times. When you receive an error message informing you that VirtualLab cannot connect, that means your computer is not able to establish a connection with our servers. Here are a few tips on how to resolve such a problem:

  • Check your internet connection by attempting to load a Web browser or another Internet application.
  • Make sure all cables are connected properly.
  • If you are running VirtualLab™ on a computer that is behind a firewall, then try disabling your firewall and connecting again.
  • If you are trying to connect through a network in your workplace, then you should contact your system administrator. Many times companies have firewalls or other devices set up so that you will be unable to connect to our servers.
  • Try connecting via a proxy server by modifying your advanced settings.
  • If you are connecting through a proxy, make sure the proxy is not down and that you have selected the correct type in the Network Settings dialog
  • Try connecting from another computer

If you just can’t seem to fix the connection problem, please visit the VirtualLab product page for additional support options.

0

0

Back To Top

My Session “Times Out” When I Try To Connect

There are a few reasons why a connection can “time out.”

  • You are doing too many things on your computer at once (i.e., browsing the Web, downloading files, sending e-mails). Try to minimize your use of the Internet when using VirtualLab™.
  • If you are connecting through a proxy, it may be taking too long to send a connection reply. Contact your network administrator.
  • The VirtualLab™ server maybe overloaded at the moment. Please wait five minutes and try again.

Please visit the VirtualLab product page for additional support options.

0

0

Back To Top

My Session has Expired?

VirtualLab™ handles thousands of recoveries each day.

If your session has expired, then you should start a new recovery session.

0

0

Back To Top

Why Are My Files Corrupt?

Occasionally there is too much filesystem damage to allow a file to be completely intact when recovered. This is known to happen on a rare occasion and is usually caused by easily preventable circumstances.

When a drive begins to fail, writing to the drive may overwrite portions of the file system, causing the file system to point to files in the wrong locations on the drive. When this happens, VirtualLab™ looks to where the file is supposed to be and recovers the data there. It has no way of determining if the data at that location is valid or invalid.

To prevent this from happening, you should attempt to preview files after the recovery scan to make sure that the data is valid. If a few picture or movie files are able to be previewed successfully, then chances are the rest of your data is fine. However, if previewing most of the picture or movie files fails, there is a high chance that the recovered data will end up being corrupted.

If all of the previewing fails, try performing a Recover Initialized/Erased Drive recovery and enable the File Type scan by clicking ‘Yes’ when prompted. Then select the files you want to recover by type in the following dialog. This will cause VirtualLab to search for catalog trees AND search for files by using file signatures which always recover correct file data, but do not always able to recover the file name.

Do not give up! A professional data recovery service such as BinaryBiz may still be able to recover that data.

0

0

Back To Top

Why Can’t VirtualLab Find My Drive?

If your drive is physically damaged or is encountering read errors then, in some cases, VirtualLab™ will be unable to find your drive. Another reason that VirtualLab could be unable to find your drive is that you have not set up your system’s architecture correctly. If the drive is not able to be recognized by your system, then chances are VirtualLab™ will not be able to notice it either.

Here’s what to do if your drive isn’t showing up:

  • Make sure the drive is connected and powered on. It’s a good idea to restart your computer with the drive connected and powered on.
  • If the drive is USB or Firewire, use the MacOS X version of VirtualLab™, which can access these drives even when they do not mount on the desktop.
  • Relaunch VirtualLab™.
  • Please visit the VirtualLab product page for additional support options.
  • Remember, do not try to recover a physically failing device. Instead, contact BinaryBiz for professional data recovery service!

0

0

Back To Top

Why Does VirtualLab Keep Freezing?

If your system freezes while running VirtualLab™ then you may not have installed the software properly or you are running it in an environment with which the software isn’t compatible. Please see the notes in this user guide regarding compatible systems and installation.

If you have already completed the installation correctly and are using a compatible system, but your computer is still freezing, you may not have enough system resources to run properly. You most likely can correct this by closing all other applications while using VirtualLab™.

Here’s what to do if VirtualLab™ keeps freezing:

  • MacOS 9.x: Select the option to Skip Bad Sectors before scanning again. The lockups may be occurring because of bad blocks on the drive. If this does not alleviate the problem, contact support.
  • MacOS X: Please visit the VirtualLab product page for support.

Another reason that VirtualLab™ could be freezing is that you are running it on a damaged drive. If you think your drive may be damaged, you should send it to our in-lab recovery team. Please visit BinaryBiz’s Data Recovery for more information.

Please contact support if you are unable to resolve this problem.

0

0

Back To Top

VirtualLab™ Is Running Out of Memory?

If you see a message that indicates VirtualLab™ is running out of memory during a scan, here’s what you should do:

  • MacOS 9.x: Select VirtualLab™ in the Finder and Get Info on the application (Command – I). Increase the preferred memory size by 1000-5000 and try again. If you continue to have this problem, you may not have enough memory on your machine. Increase or turn on Virtual Memory in the Memory control panel, or try running VirtualLab™ in MacOS X.
  • MacOS X: Please visit the VirtualLab product page for additional support.

0

0

Back To Top

VirtualLab™ Can’t Save My Files

If you are trying to save to a drive that you know has enough free space for the files that you are recovering, make sure the drive is not locked and that you have enough permissions to write to the drive. This can easily be tested by trying to copy any file to the drive in the Finder. If you can copy files to the drive but VirtualLab™ is still unable to save files to it, contact support.

0

0

Back To Top

VirtualLab™ Can’t Find The Types Of Files I Selected

There are a few reasons that VirtualLab cannot find the file type you are looking for.

  1. The data for files of this type have already been overwritten at a previous time. This can happen if you are trying to recover deleted files, and accidentally copy new data to the drive before trying to recover the deleted files. The data you copy to the drive overwrites the deleted file data and makes it impossible to recover those files using VirtualLab.
  2. You selected conflicting file types in the list of signatures. Occasionally a signature will be created that ‘poses’ for another type of file. That is, when VirtualLab searches for one file type, another signature fits the pattern of the file as well and VirtualLab marks it as that type of file. To alleviate this problem, select ONLY the file type you are having trouble recovering and run the scan again.
  3. You duplicated one file several times when you created a new signature instead of having six unique files of the same type. If you do not have enough files to create a signature, do not duplicate one file in an attempt to create a signature. VirtualLab™ cannot find files when this is done because it needs six UNIQUE files to generate a signature. Create more files that are all unique and try creating a new signature again.

If you do this and are still unsuccessful, please visit the VirtualLab product page for additional support options.

0

0

Back To Top

Viewing the Log

If an error occurs during recovery, VirtualLab™ will record the error in a log, which you can view by going to File > Open Log. The log lists all files that had errors during the recovery and why. This list is useful to send to the support site if you cannot correct a problem yourself.

0

0

Back To Top

Upgrading VirtualLab

Upgrading VirtualLab™

Upgrading VirtualLab™ Client is easy. That’s because every time you launch the application while connected to the Internet, VirtualLab™ Client automatically checks to see if an upgrade is available! If your current version is out of date, your browser will launch, and you will be taken to a Web page where you can download the latest version of the software for free.

0

0

Back To Top

Need Further Assistance?

Need Further Assistance?

We want to help you get your data back!   We have multiple support options, in the event you still need help after reading this guide:

Technical support

Support Options
Monday – Friday 8am to 5pm PST
We offer email support, FAQ’s, forums and LiveChat. We work very hard to give you the best support we can!

Total Recall Data Recovery

If VirtualLab does not “see” your drive or data, don’t give up!

We use and recommend BinaryBiz Data Recovery for professional data recovery assistance, and they may still be able to recover your data. You can get a free data recovery estimate by clicking here.

Good Luck! And thank you for your patronage!

0

0

Back To Top

Email Us